Everything you need to build the internet’s most popular DIY desk — from choosing your size to cable management, accessories & long-term care.
If you have spent any time browsing Karlby desk setup ideas on Reddit, YouTube, or Instagram, you already know this: the IKEA KARLBY countertop has become the undisputed gold standard of the DIY desk world. Originally designed as a kitchen worktop, the IKEA Karlby desk setup has been adopted by remote workers, gamers, streamers, and creatives who want a premium-looking, spacious desk without the premium price tag.
In this guide, we walk you through everything you need to know — from choosing your size and supports to cable management, accessories, and long-term care — so you can build a Karlby desk setup that rivals workspaces costing two or three times as much. Looking for more inspiration first? Check out our roundup of the best desk setup ideas or browse our favorite IKEA desk setup ideas for more combinations.
Table of Contents
- What Is the IKEA Karlby?
- Step 1 — Choose Your Size & Finish
- Step 2 — Choose Your Supports
- Step 3 — Assembly: Step by Step
- Step 4 — Cable Management
- Step 5 — Accessories & Setup Ideas
- Popular Karlby Desk Setup Topics
- Frequently Asked Questions
What Is the IKEA Karlby?
The IKEA KARLBY is a thick kitchen countertop available in walnut, oak, and birch finishes. It comes in two sizes — 74 inches and 98 inches — and is approximately 1.5 inches (3.8 cm) thick. Thanks to its butcher-block aesthetic and solid construction, it has become the most popular countertop for Karlby desk setup builds worldwide.
The countertop is built from a particleboard core topped with a thick layer of genuine hardwood veneer. This layered construction makes it more stable and less sensitive to humidity compared to solid wood, meaning it is less likely to warp, split, or crack over time.
| Spec | Details |
|---|---|
| Sizes | 74″ and 98″ lengths |
| Finishes | Walnut, Oak, Birch |
| Thickness | 1.5″ (3.8 cm) |
| Depth | ~24″ (60 cm) |
| Price range | ~$159–$249 depending on size & finish |
| Core material | Particleboard with thick hardwood veneer top layer |
| IKEA category | Kitchen worktops (repurposed as desk) |
Step 1 — Choose Your Size & Finish
Before you buy, decide what you actually need. Here is a quick guide to the right size for your Karlby desk setup:
- 74-inch Karlby: Perfect for single or dual monitor setups. Fits up to three monitors and still has room for peripherals. The most popular choice for home offices and work from home desk setups.
- 98-inch Karlby: Ideal for triple monitor builds, ultrawide setups, or creating an L-shaped corner desk by using two countertops together. Best for streamers and gaming desk setups.
For finish, match your room aesthetic:
- Walnut — the most popular. Dark, warm tones with rich grain. A statement piece for any room, and a top pick for aesthetic desk setups.
- Oak — lighter and more versatile. Works well in Scandinavian, minimalist, and farmhouse-style spaces. Popular in minimalist desk setups.
- Birch — the lightest finish, with a narrow stave pattern that gives it a timeless, clean look. A great fit for clean desk setups.
Step 2 — Choose Your Supports
The Karlby is just a countertop — it needs legs or supports. You have four main options for your Karlby desk setup:
Option A: IKEA ALEX Drawers (Most Popular Karlby Desk Setup)
The IKEA ALEX + Karlby combination is the most-built desk hack in the world. ALEX drawer units are the perfect height at around 27.5 inches, provide 5 drawers each for storage, and their weight helps keep the countertop stable without any drilling. Simply place the countertop on top of two ALEX units with the included rubber bumpers — no screws required. This is the classic Karlby desk setup that dominates Reddit, YouTube, and Instagram because it delivers a premium look for $350–500 total.
Option B: IKEA ADILS or OLOV Legs
For a more budget-friendly Karlby desk setup, ADILS legs (fixed height) or OLOV legs (adjustable height) can be screwed into the underside of the Karlby. Lighter on storage but cheaper, and creates a cleaner, more open look. For the 74″ or 98″ Karlby, always add a center-back leg to prevent sagging over time.
Option C: Trestle Legs (Lerberg)
Trestles give an open, industrial look to your Karlby desk setup. Place one on each side and one in the middle for stability. Use strong Velcro pads to keep them aligned and prevent shifting.
Option D: Motorized Standing Desk Frame
For the ultimate ergonomic desk setup, pair the Karlby with a motorized standing desk frame such as the Fully Jarvis or Uplift V2. The Karlby’s weight and thickness make it an excellent tabletop for these frames, creating a premium sit-stand Karlby desk setup for a fraction of the price of a pre-built option. If you are considering a dedicated electric option, our Fezibo electric standing desk review is worth a read.
⚠️ Sag Prevention Rule: IKEA recommends a maximum distance of 32 inches between supporting legs. For the 74″ or 98″ Karlby, always add at least one center support leg or drawer unit to prevent bending and sagging over time — especially with heavy monitors placed in the middle.
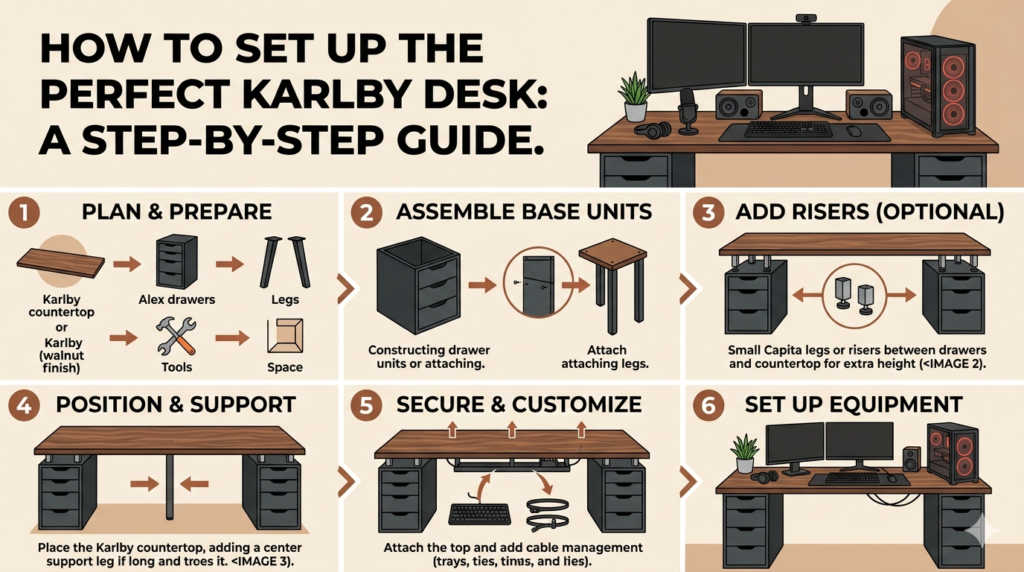
Step 3 — Assembly: Step by Step
Assembly is refreshingly simple. Here is the full process for your Karlby desk setup:
- Assemble your supports first — build the ALEX drawers or attach desk legs according to their instructions.
- Position your supports in your desired desk location. For dual ALEX units on a 74″ top, space them evenly, leaving equal overhangs on each side.
- Add a center support (recommended for 74″+ tops): screw a single ADILS leg into the center-back underside of the Karlby.
- Place the Karlby on top. The countertop is heavy — get a second person to help you lift it.
- Secure it using the small clear rubber bumpers included with ALEX drawers. No drilling needed when using ALEX units as supports.
- Level the desk — adjust the plastic feet on ALEX units to ensure your surface is perfectly flat.
💡 Pro Tip: Use a tape measure to center the ALEX units under the Karlby before setting it down. Aim for equal overhangs on left and right for a balanced, professional Karlby desk setup.
Step 4 — Cable Management
One of the most overlooked aspects of any Karlby desk setup is cable management. A beautiful build can look messy without it. Here are the best solutions:
- Under-Desk Cable Management Tray — Mount a tray to the underside of the Karlby to hide power strips and cables completely out of sight. IKEA’s SIGNUM is a popular choice for the Karlby desk setup.
- Cable Drill Holes — Drill 2–3 inch cable pass-through holes in the Karlby for a truly clean look. Use a hole saw bit and go slowly to avoid chipping the veneer. Finish with a desk grommet for a professional result.
- Velcro Cable Ties — Run cables along the back of the desk and secure with reusable Velcro ties. Easy to adjust as your setup changes.
- Adhesive Cable Clips — Route individual cables along the underside edge of the countertop for a neat, hidden path.
Step 5 — Accessories & Setup Ideas
Once your base Karlby desk setup is built, it is time to personalize. Here are the most popular accessories seen in Karlby desk setups:
Monitors & Display
- Monitor Arm — Frees up 6–8 inches of desk depth and enables perfect ergonomic positioning at eye level.
- Ultrawide Monitor — A single ultrawide on a 74″ Karlby creates a stunning, uncluttered focal point.
Lighting
- LED Strip Lights — Run strips along the back wall or under the desk for warm ambient lighting that complements the wood tones of the Karlby desk setup.
- Desk Lamp — An Edison bulb industrial lamp pairs beautifully with walnut and oak finishes.
Organization
- IKEA SKADIS Pegboard — Mount above the desk for headphone hooks, small containers, and accessories.
- IKEA LACK Shelf — Add a floating shelf above your Karlby desk setup for plants, books, or a speaker.
- Desk Mat — Protects the Karlby surface from mouse wear and scratches, while adding a premium, cohesive look to the setup.
Personal Touches
Add plants (real or IKEA FEJKA artificial), figurines, or framed art. The warm wood tone of the Karlby makes it an ideal backdrop for personal decor that brings warmth and character to your workspace. Working with limited space? These small desk setup ideas show how to make the most of a tight footprint with a Karlby.
Popular Karlby Desk Setup Topics
Here is what people are searching for most — and what you need to know about each topic:
Karlby Desk Setup Reddit
The r/battlestations and r/ikeahacks communities are the best places to see real Karlby desk setup builds, get feedback on your own plans, and discover budget tips from experienced builders. Searches for “Karlby desk setup Reddit” consistently show up in the top searches around this topic — the community has been building and refining this setup for nearly a decade, and there is a build thread for virtually every variation and use case. Sort by “Top” on r/battlestations and filter by “IKEA” to see the best real-world examples.
Karlby Desk Setup Ideas
Popular Karlby desk setup ideas include minimal all-white setups with oak Karlby, dark moody setups with walnut paired with all-black ALEX drawers, and standing desk hybrids with motorized frames. The Karlby’s wood finish makes it compatible with almost every desk aesthetic style — from Japandi to dark academia to editorial monochrome. See more desk setup ideas for broader inspiration across every style.
Karlby Desk Setup Hack
The most celebrated Karlby desk setup hacks include pairing the Karlby with ALEX drawers (no screws needed), adding a motorized standing desk frame for sit-stand functionality, or combining two 98″ Karlbys for a massive L-shaped corner desk with a custom bracket at the joint. The L-shaped Karlby hack is particularly popular in gaming and streaming setups because it creates a wrap-around workspace at a fraction of the cost of a purpose-built corner desk.
Karlby Desk Hack
Beyond ALEX drawers, popular Karlby desk hacks use custom steel hairpin legs for a mid-century modern look, industrial pipe legs for a raw workshop aesthetic, or IKEA KALLAX shelf units as a base for even more storage. The Karlby’s thickness means it can safely span most custom leg configurations without needing additional reinforcement, as long as the center-back support rule is followed.
Karlby Desk Legs
Karlby desk leg options include: ALEX drawers (storage + stability, most popular), ADILS/OLOV legs (minimal and affordable, best for clean looks), Lerberg trestle legs (open and airy, industrial aesthetic), and motorized standing desk frames (ergonomic sit-stand capability). All options work with the KARLBY without any modification to the countertop except for the standing desk frames, which require screws into the underside.
IKEA KARLBY Countertop
The IKEA KARLBY countertop is available at IKEA stores and IKEA.com in birch, oak, and walnut finishes, in 74″ and 98″ lengths. Check stock availability online before visiting your store — walnut is the most popular finish and frequently sells out, while oak and birch are typically more readily available. The KARLBY is sold in the kitchen section of IKEA but is universally used as a desk surface by the maker and remote work communities.
IKEA Karlby Desk Sag
Sagging can occur on longer Karlby desk setups without center support. This is especially common with the 98″ version when heavy monitors are placed in the center without a midpoint support. The fix is straightforward: always add a center support leg or drawer unit beneath the midpoint of the countertop. IKEA recommends a maximum of 32 inches between supporting legs. Some builders also reinforce the underside with a metal L-bracket or beam for extra rigidity on very long or heavily loaded setups.
Frequently Asked Questions
How much does a Karlby desk setup cost?
A complete Karlby desk setup costs $350–500 for the most popular configuration. The KARLBY countertop itself runs $159–249 depending on size and finish. Two IKEA ALEX drawer units add $165–330 (two at $80–165 each). A center ADILS support leg adds about $8. Total for a full Karlby + ALEX setup: approximately $350–500. Adding accessories — monitor arm ($40–80), cable tray ($20–30), desk mat ($30–60) — brings a fully equipped Karlby desk setup to $450–650. For a standing desk Karlby setup using a motorized frame like the Fully Jarvis, add $350–500 for the frame, bringing the total to $700–900.
Is Karlby real wood or veneer?
The IKEA Karlby is neither purely solid wood nor basic laminate. It is built with a particleboard core covered by a thick layer of genuine real wood veneer — approximately 1/8″ of actual hardwood. IKEA describes this as a “thick veneer worktop” that combines the best of solid wood construction with engineered stability. The result is an authentic wood grain surface that is more stable and less prone to warping than solid wood, while also being more affordable and sustainable.
Can you use a Kallax as a desk?
Yes — the IKEA Kallax is one of the most popular desk bases in the IKEA hacker community. You can lay a Kallax horizontally and place a tabletop on top of it, or use IKEA’s own INLÄGG connector hardware to officially attach a LAGKAPTEN or LINNMON tabletop. A Kallax serves as both desk support and storage, with cube compartments for folders, accessories, or bins. IKEA even sells a ready-made KALLAX/LAGKAPTEN workstation combination in its product lineup.
Can you drill into IKEA Karlby?
Yes, you can drill into the Karlby. Many people do so to create cable pass-through holes. Use a 2–3 inch hole saw drill bit and drill slowly to prevent chipping the veneer surface. The Karlby’s solid particleboard core drills cleanly compared to hollow-core tabletops. After drilling, finish the hole with a desk grommet ($10–15) for a professional, polished result.
What are popular IKEA desk hacks?
The most popular IKEA desk hacks include: the Karlby + ALEX drawers combo (the most replicated setup online), the Kallax as a desk base (horizontal or as drawer storage), the budget LINNMON + ADILS setup, pairing any IKEA tabletop with a motorized standing desk frame, and creating L-shaped desks by combining two countertops at a corner with a custom bracket or joiner.
What is the lifespan of an IKEA desk?
Lifespan varies by tier. Budget options like LINNMON/ADILS typically last 2–3 years under heavy daily use. Mid-range options like LAGKAPTEN/ALEX last 4–6 years. Premium models like the KARLBY can last 7–10+ years with proper care. The Karlby’s thick veneer surface can be sanded and re-oiled when damaged, effectively resetting its appearance and extending its lifespan well beyond most desks in its price range.
What is the most ergonomic Karlby desk setup?
The most ergonomic Karlby desk setup pairs a motorized height-adjustable frame (like the Fully Jarvis or Uplift V2) with the Karlby countertop. This lets you alternate between sitting and standing every 30–60 minutes. Add a monitor arm to set your screen at eye level, a supportive chair for seated work, and an anti-fatigue mat for standing. Set your monitor so the top of the screen is at or slightly below eye level, with elbows at roughly 90 degrees when typing. Not sure what height is right for you? Our guide to ideal desk height covers the exact measurements for sitting and standing. For full ergonomics advice, see our dedicated ergonomic desk setup guide.
Does IKEA Karlby bend?
The Karlby can develop a slight sag or bend over time, particularly on longer setups with heavy equipment placed in the center without adequate support. This is more common with the 98″ version. The fix is simple: always add a center support leg or drawer unit beneath the midpoint of the countertop. IKEA recommends a maximum of 32 inches between supporting legs. Some builders also reinforce the underside with a metal beam for extra rigidity on very long setups.
Can you sand an IKEA Karlby?
Yes — and this is one of the Karlby’s standout advantages over laminate alternatives. Because the surface is genuine hardwood veneer, it can be sanded and refinished. Sand with 120–150 grit to remove damage, then progress to 220 grit for a smooth finish, and apply a wood treatment oil (such as Danish oil or Odie’s oil) in two coats to seal and protect. This process effectively restores the Karlby to near-new condition and significantly extends its lifespan.
How durable is the IKEA Karlby?
The Karlby is durably built for its price class but requires some care. Its thick hardwood veneer surface is more resistant to everyday wear than basic laminate desks. However, it is porous and can scratch or stain if untreated. IKEA recommends treating it regularly with wood oil for protection. Avoid placing hot items directly on it, and always use a desk mat for mouse use to prevent surface wear. With proper maintenance, a Karlby desk setup can last well over a decade and develops a natural patina that looks better with age. If you spend long hours at your desk, also consider your wrist positioning — prolonged mouse use can lead to discomfort. See our guides on wrist pain from mouse use and carpal tunnel desk setup tips for prevention advice.
Final Tip: Start With the Basics, Then Upgrade
The beauty of the Karlby desk setup is that it grows with you. Start with the countertop and two ALEX drawer units, get comfortable with the space, then add a monitor arm, cable management tray, lighting, and accessories one piece at a time. This approach spreads the cost and ensures every upgrade is genuinely useful.
Whether you are building a gaming desk setup, a clean work from home setup, or a laptop desk setup, the Karlby countertop offers a foundation that rivals setups costing far more. Accessibility matters too — if you need extra clearance or adaptability, our wheelchair desk setup ideas show how to adapt this build for all users. Keep it oiled, add a center support, pair it with smart accessories — and you will have a Karlby desk setup that serves you well for many years to come.