Why Your Sourdough Starter Keeps Dying (And How to Revive It)
The Ultimate Troubleshooting Guide for Beginners
If your sourdough starter keeps dying, turning funky, refusing to rise, or doing absolutely nothing no matter what you try… you’re not alone.
Beginners—and even experienced bakers—struggle with maintaining a healthy starter because sourdough is a living culture. It needs the right environment, ingredients, and maintenance to stay alive.
This comprehensive guide breaks down exactly why your starter keeps failing, how to revive a weak or dying starter, and how to keep it thriving longterm.
Everything here is based on real science, real baker experience, and practical steps you can follow immediately.
If you want a complete step-by-step sourdough system, check out the Sourdough Mastery Cook Book, which includes starter guides, troubleshooting charts, and 40+ recipes designed for beginners.
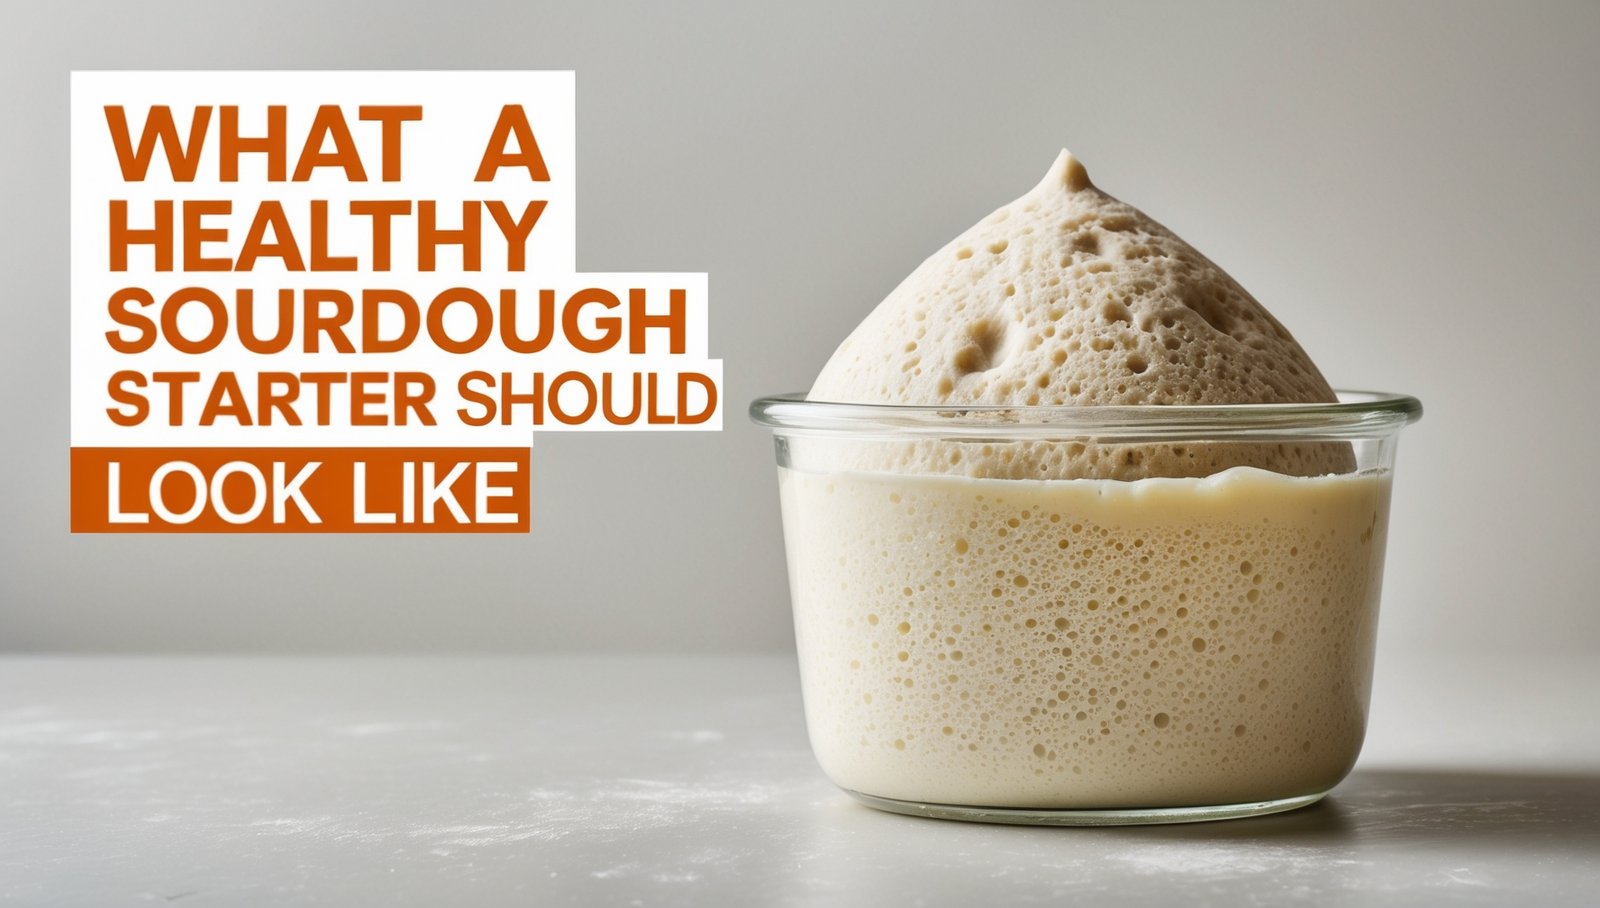
Understanding What a Healthy Sourdough Starter Should Look Like
The Science Behind Natural Fermentation
A sourdough starter is made from flour + water + wild yeast + beneficial bacteria. When all four elements work in harmony, your starter becomes a bubbly, thriving ecosystem capable of rising dough naturally.
Healthy fermentation depends on:
-
Temperature
-
Hydration
-
Feeding schedule
-
Type of flour
-
Proper container and airflow
If any of these variables fall out of balance, the microbial activity collapses—and your starter suffers.
Signs of a Happy, Active Starter
A healthy starter will show:
-
Lots of small and medium bubbles
-
A rise of 50–100% between feedings
-
A pleasantly tangy, slightly yeasty aroma
-
A smooth, stretchy texture
-
A dome-shaped top when fully active
If your starter has these characteristics, you’re doing everything right.
Visual Red Flags That Signal Trouble
If your starter displays any of the following, something’s wrong:
-
No rise at all for days
-
Orange or pink streaks (throw it out immediately)
-
Fuzzy mold
-
Strong rotten or chemical smell
-
Thick crust forming on top
-
Water separation (hooch)—not deadly, but a sign it’s hungry
Identifying problems early makes reviving your starter much easier.

The Most Common Reasons Your Sourdough Starter Keeps Dying
Below are the top mistakes most beginners make—and exactly how to fix them.
Reason #1: You’re Using Chlorinated Tap Water
How Chlorine Kills Yeast and Bacteria
Chlorine is added to municipal water systems to kill harmful microorganisms…
which unfortunately includes the beneficial organisms in your starter.
Even small amounts can dramatically weaken microbial activity.
Safe Water Options
Use any of these instead:
-
Filtered water
-
Boiled and cooled tap water
-
Bottled spring water (not distilled)
These options give your starter a safe environment to thrive.
Reason #2: Your Starter Is Too Cold or Too Hot
Ideal Temperature Range
Your starter thrives between:
75°F–82°F (24°C–28°C)
Below 70°F, activity slows dramatically.
Below 60°F, fermentation may stop altogether.
Extreme heat (over 95°F) can kill your culture permanently.
How Temperature Affects Activity
-
Too cold = slow rise, no bubbles
-
Too hot = bacteria imbalance, sour smell, thin texture
-
Perfect temperature = consistent rise, sweet aroma
If your kitchen is cold, store your starter near warm appliances or use a proofing box.
Reason #3: You’re Not Feeding It Often Enough
Understanding Feeding Schedules
A starter is like a pet—it needs consistent “meals.”
Room temperature starter:
Feed every 12 hours.
Refrigerated starter:
Feed once per week.
How Long a Starter Can Survive Unfed
-
24–48 hours unrefrigerated: fine
-
1–2 weeks in fridge: usually fine
-
4+ weeks: weak, sluggish, possible contamination
-
3+ months: often dead
Regular feeding keeps microbial levels balanced.
Reason #4: You’re Using the Wrong Flour
Why Whole Wheat & Rye Are Better
Whole grain flours have:
-
More natural yeast
-
More minerals
-
Higher nutrients
-
More fermentable sugars
This leads to stronger, more resilient starters.
Flours That Cause Problems
-
Bleached all-purpose flour
-
Old or rancid flour
-
Distilled white flour with no nutrients
If your starter is weak, switch to rye flour for 48 hours—it often revives even dying cultures.
Reason #5: Contamination From Dirty Jars or Tools
What Contaminates a Starter?
Bad microbes enter through:
-
Dirty jars
-
Sticky residue
-
Dirty spoons
-
Cross-contamination from other foods
-
Metal bowls that react with acidity
How to Prep Your Jar Correctly
-
Wash with hot soapy water
-
Rinse well
-
Air dry completely
-
Use glass, not plastic or metal
-
Use a breathable cover (cloth or coffee filter)
Clean containers = healthy fermentation.
Reason #6: Feeding the Wrong Ratios
The Perfect Beginner Ratio
Use:
1:1:1 ratio
(starter : flour : water by weight)
Example:
50g starter
50g flour
50g water
This creates a balanced ecosystem that feeds yeast without overwhelming it.
How Overfeeding Hurts Your Starter
Adding too much flour/water dilutes the yeast population, making it too weak to rise.
Underfeeding leaves too much acid and alcohol buildup.
Balance is everything.
Reason #7: Neglecting Your Starter in the Refrigerator
How Long It Really Lasts
A refrigerated starter is dormant—not dead. But it still needs food.
Good timeline:
-
1 week – perfectly fine
-
2–4 weeks – weak but revivable
-
4–8 weeks – risky
-
8+ weeks – usually dead
How to Wake Up a Chilled Starter
-
Remove from fridge
-
Let it warm for 1 hour
-
Discard half
-
Feed 1:1:1
-
Repeat every 12 hours for 2–3 days
Most starters bounce back with this method.
Is Your Sourdough Starter REALLY Dead? How to Tell
When It’s Still Salvageable
Your starter is NOT dead if:
-
It’s separated with hooch
-
It smells like alcohol
-
It’s sluggish but not moldy
-
It rises but falls quickly
-
It’s thin or watery
These are signs of hunger—not death.
When You Must Throw It Out
Your starter is truly dead if you see:
-
Pink, orange, or red streaks
-
Fuzzy mold (green, black, blue)
-
Hair-like growth
-
Rotten or chemical odor
If in doubt, throw it out and start fresh.
Step-by-Step Guide to Reviving a Dying Starter
This method is extremely reliable—even for starters that seem hopeless.
Step 1 – Switch to Rye or Bread Flour
Rye produces fast fermentation, boosting microbial activity.
Step 2 – Feed Smaller, More Consistent Amounts
Use small 1:1:1 feedings to concentrate the yeast population.
Step 3 – Increase Temperature for 48 Hours
Place near:
-
Warm oven light
-
Top of fridge
-
Heating pad on lowest setting
Warmth = faster revival.
Step 4 – Remove Half Before Each Feeding
This prevents acid overload and encourages fresh microbial growth.
Step 5 – Repeat Until It Doubles Predictably
A healthy starter should double within 4–6 hours at warm room temperature.
Troubleshooting Revival Problems
If It Smells Bad
Vinegar or alcohol smell = hungry
Rotten smell = contamination
If It’s Too Watery
Add slightly more flour at next feeding.
If It Rises Then Collapses
Feed smaller amounts more often.
If It Shows Zero Activity After 3 Days
Switch to rye flour and increase warmth.
Preventing Future Starter Death: Long-Term Tips
Daily vs. Weekly Feeding
-
Daily feeding = active starter always ready
-
Weekly feeding = perfect for casual bakers
Choose the schedule that matches your lifestyle.
How to Store Your Starter Properly
-
Use breathable cloth or loose lid
-
Keep at 75-80°F when active
-
Refrigerate only when maintaining
How to Build a Backup Starter
Always keep:
-
One in the fridge
-
One dried (spread thin on parchment)
-
One frozen
Backup starters ensure you never lose your culture again.
Best Temperature Practices
Avoid:
-
Drafts
-
Direct sunlight
-
High heat appliances
Stable temperature = stable fermentation.
FAQ: Common Sourdough Starter Issues
Why does my starter smell like alcohol?
It’s hungry—feed it.
Why is there liquid on top?
That’s hooch. Stir or pour off, then feed.
Why does my starter never rise?
Temperature or feeding ratio problem.
Why does it rise once but then stop?
Microbial imbalance—use rye for 24 hours.
Why does my starter get mold?
Dirty jar, poor flour, or long neglect.
Recommended Tools for a Healthy Starter
-
Digital scale (accurate feeding)
-
Glass jar (no contamination)
-
Thermometer strip (checks temperature)
-
Proofing box or warmer (for cold kitchens)
These simple tools drastically improve results.
Want Perfect Sourdough Every Time? Go Deeper With the Sourdough Mastery Cook Book
If you want guaranteed success with your starter and your loaves, the Sourdough Mastery Cook Book is the perfect next step.
Inside, you’ll get:
-
Exact feeding schedules
-
Step-by-step starter tutorials
-
40+ delicious sourdough recipes
-
Troubleshooting charts
-
Visual guides
-
Beginner-friendly instructions
👉 Learn more inside the Sourdough Mastery Cook Book.
This guide takes you from frustrated to confident—with perfect sourdough every time.
Final Thoughts: Your Starter Isn’t Failing—You Just Need the Right Process
A dying starter doesn’t mean you’re doing everything wrong. It simply means your culture needs more consistency, the right temperature, and proper feeding.
With the steps in this guide—and the help of the Sourdough Mastery Cook Book—you’ll finally have a starter that stays strong, active, and ready to bake anytime.